The pressure advance approach
As it came up from the theory that there is a theoretical possibility to
make the filament flow through the nozzle as rectangular as it is
commanded from the slicer. Therefore we need to implement the Dirac delta
function. The easiest approach is to push the filament a certain value
before the main extrusion starts with the highest possible speed.
This is the approach which is implemented in the firmware. It has to be
in the firmware because if it is commanded from outside you have a delay
due to the command chain which is counteracting for this effect.
For each extrusion segment the "pressure" is calculated as the amount of
steps by the given extrusion rate rext and a factor k as
psteps
= rext * k
These steps are applied immediately before an extrusion step starts or
directly after an extrusion step stops (in the opposite direction as
pressure relaxation). In practice this procedure is limited by the slip of
the extruder. Forcing the extruder to push the maximum speed possible will
end up in a slipping of the filament because we are acting against the
nozzle forces and have to provide in short time an extremely high speed.
Therefore I introduced a delay which is acting as a brake for the pressure
building up. Between each pushing step this delay (in microseconds) bill
be applied, slowing down the pressure build up to a measure where the slip
no longer occurs.
So with two parameters the pressure advance mechanism is implemented in the
firmware. I selected a rarely used gcode number for the programming of this
mechanism:
M214 Ex Ky Dz
with x the extruder indicator (0 or 1), K the factor and D the delay
time.
So far the implemented algorithm. But how do we get the correct parameters?
This was the tricky thing and I solved it in this way:
First of all we need a proper test structure. It should vary the extrusion
rate in a definite way and provide a possibility to measure the result. I
selected an octagon structure, which can fulfill these demands. In the
picture below you can see how this is done in detail.
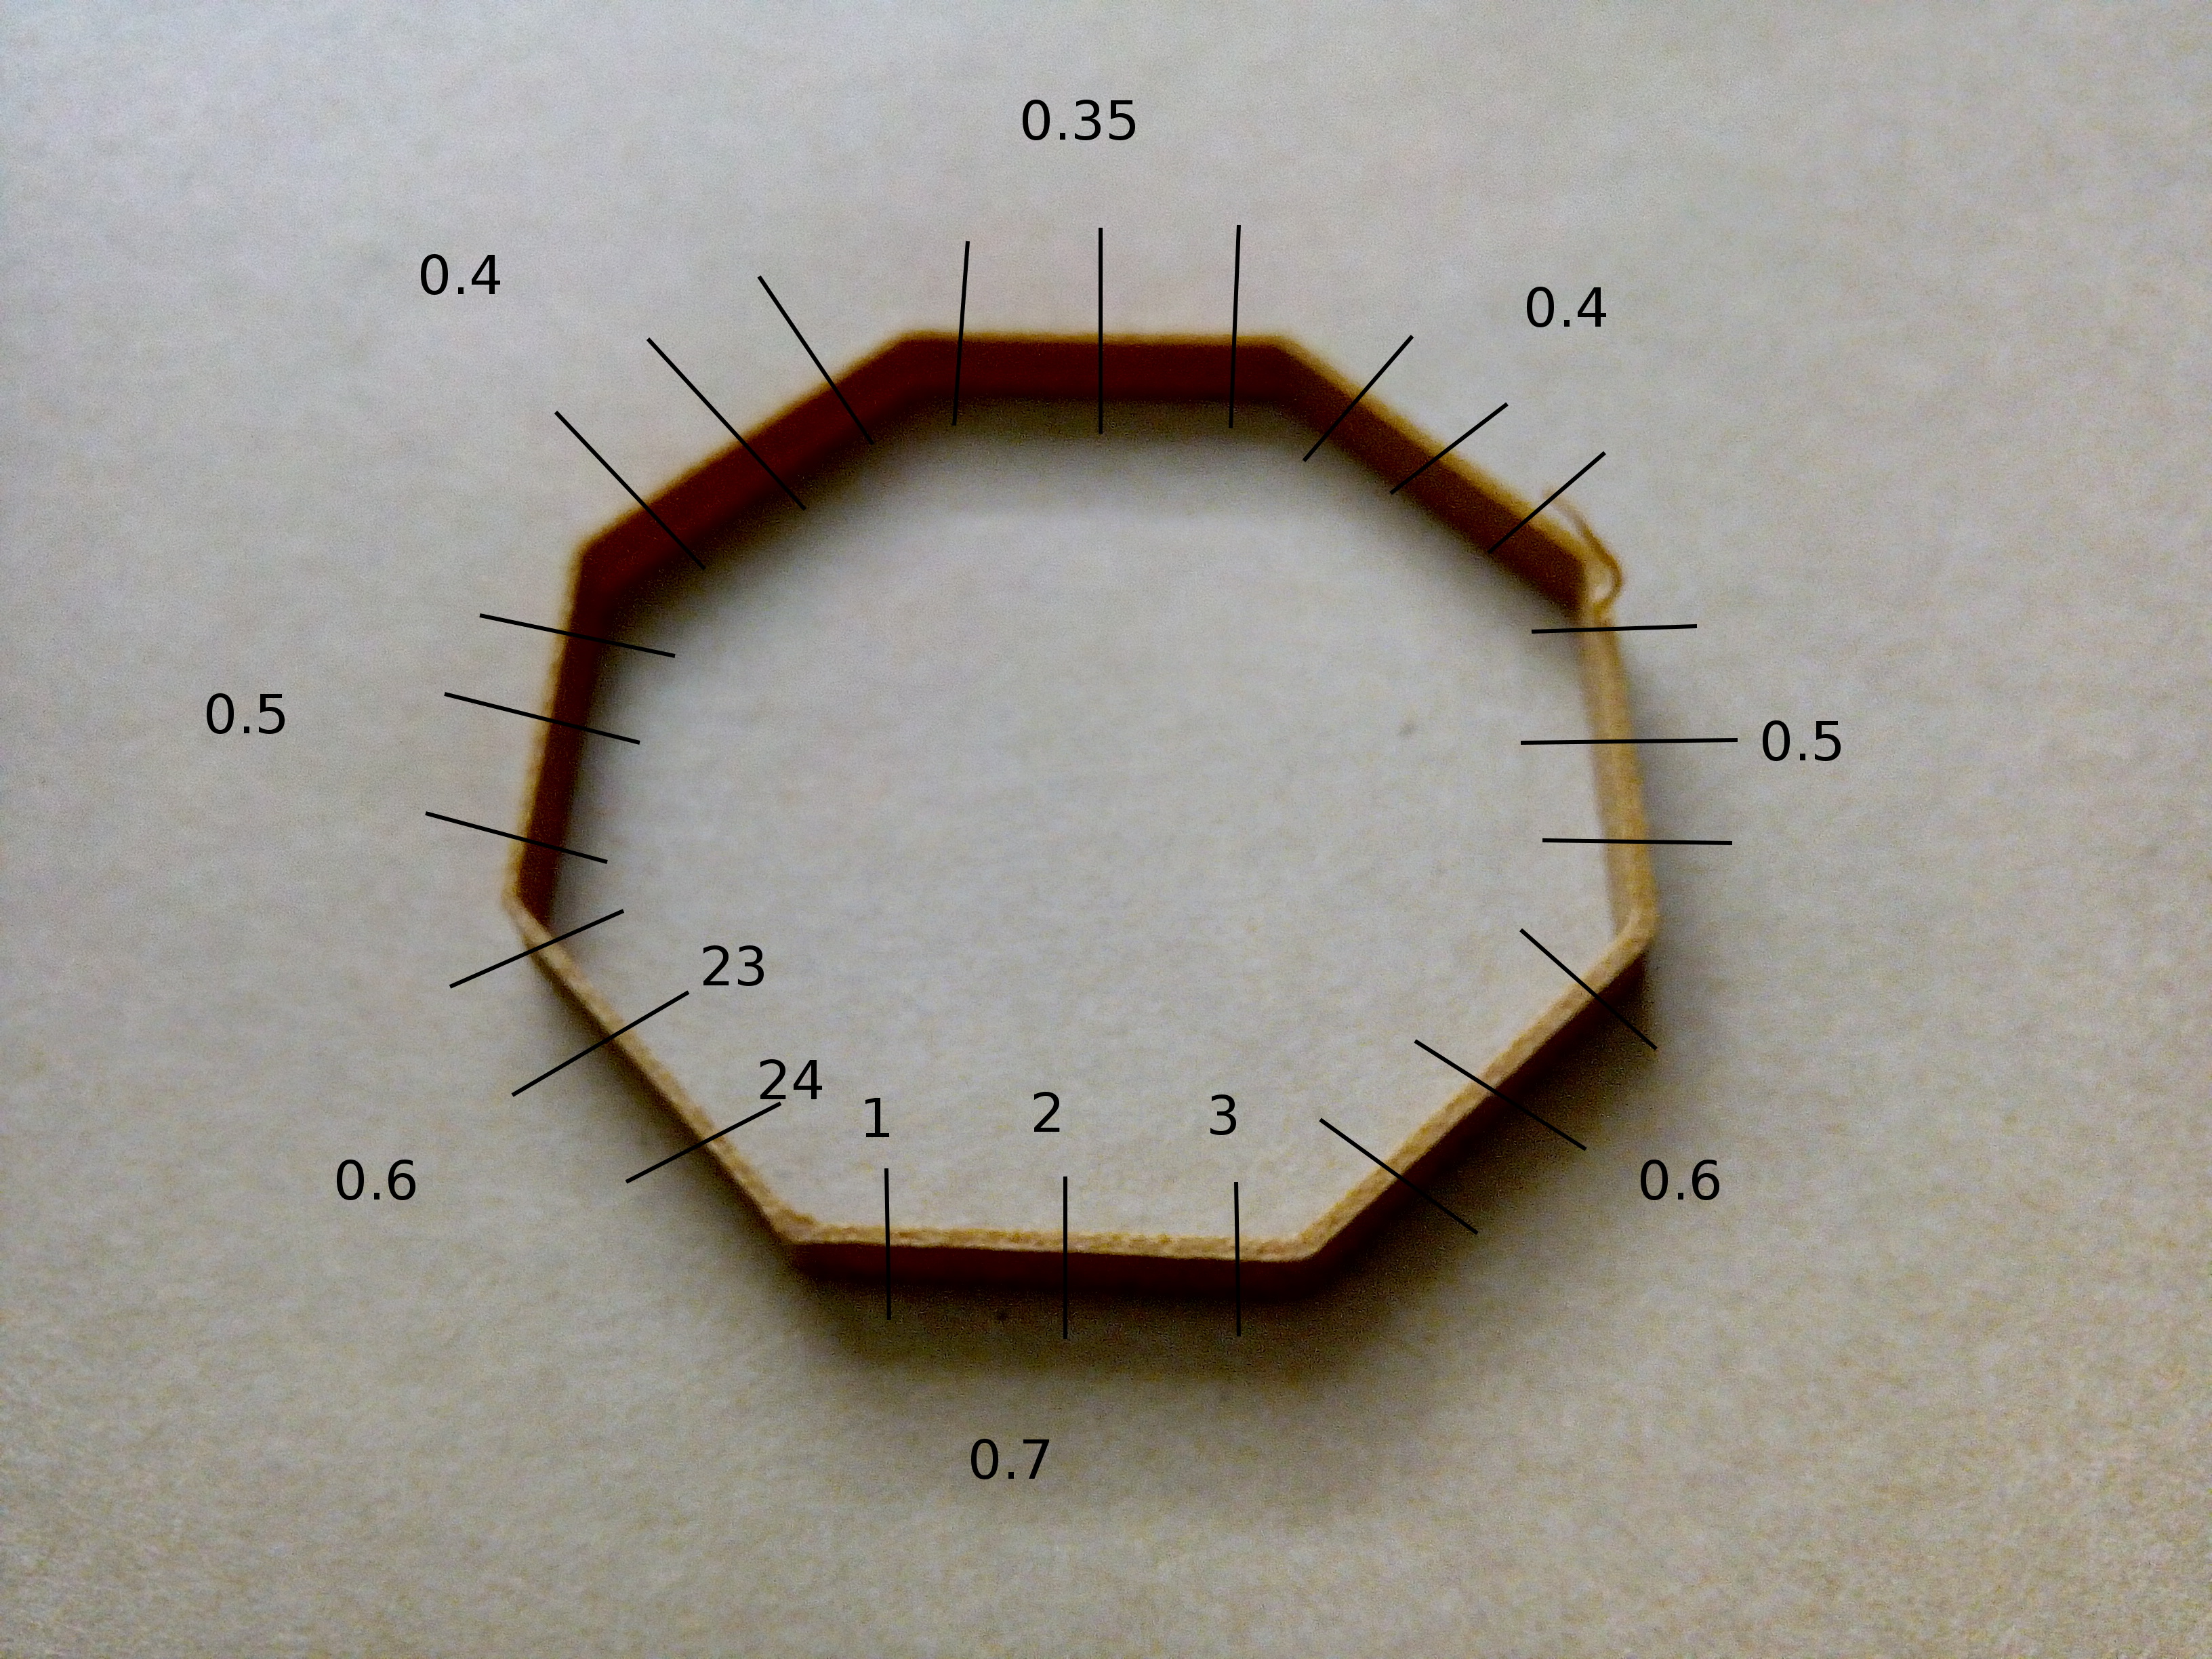
The octagon is printed as a single line counter clock wise. On
the outer side you can see the dimensions of the nominal line width and the
measurement positions for each segment. By this approach I can see the
impact ton falling and rising values of the line width.
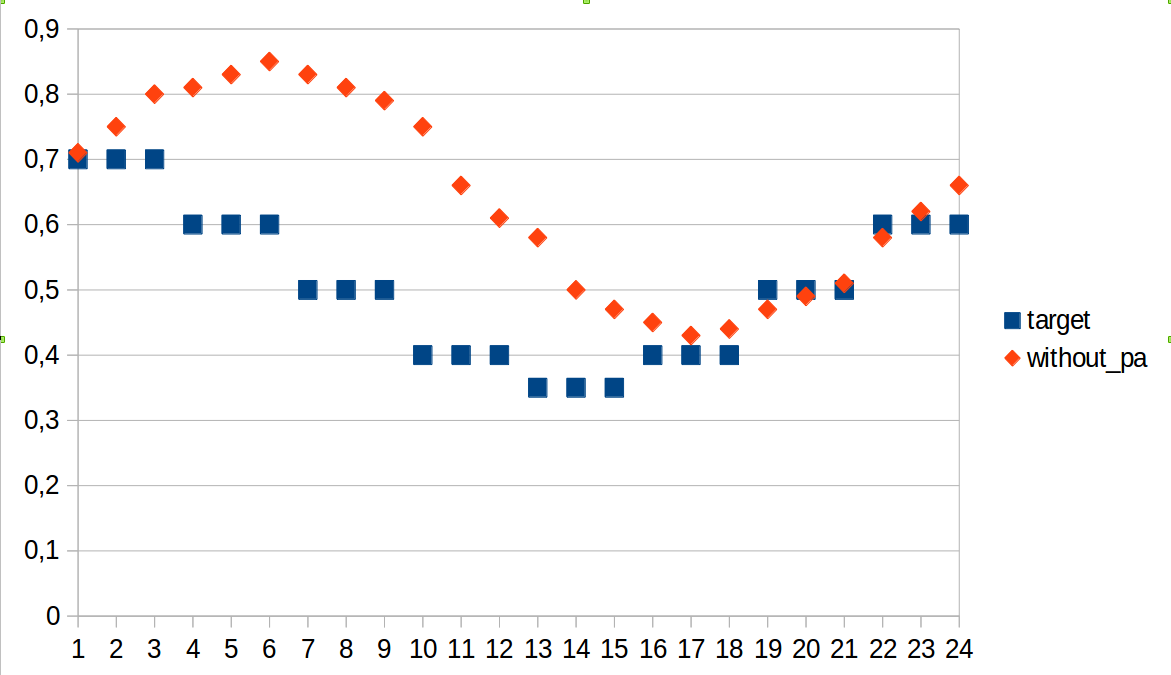
The result is quite impressive (and furthermore found on direct extruder
hardware too): You can see the shift between the commanded (blue dots) and
the real (orange points) flow.
With the presented test structure it is now possible to set the parameter
for the pressure advance mechanism in the firmware . By adjusting the K
factor it is possible to achieve a test print which looks like below:
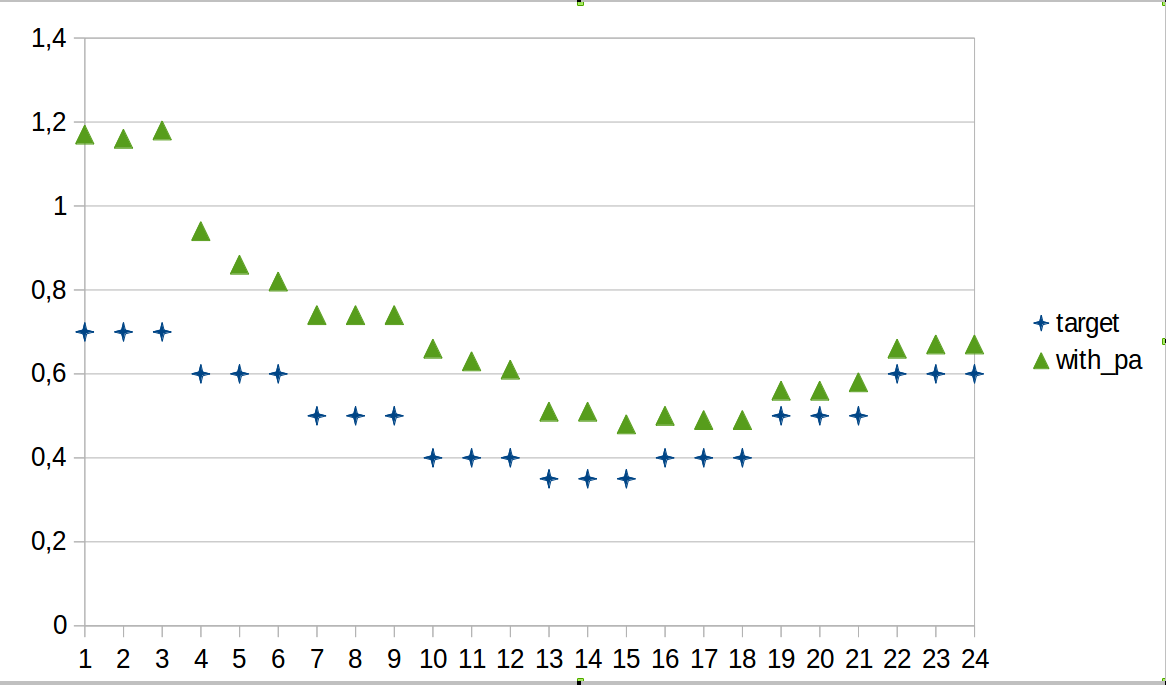
One comment to the offset found on both graphs: although the material flow
is the same for each layer, the deposition will be statistically spread
below the nozzle. The material deposition is not guided on the side, so the
material will flow freely. This spread on the lateral dimension is
generating the offset found in the graph. Furthermore, these values are
taken only from the upper half of the test print to avoid some
irregularities on the first layer.
To generate the necessary gcode I prepared a calculation table, which can be exported as
text file ( cell separator: space, no text identifier) and occasionally
exchange the commas by dots. This file can be directly printed with
the extension ".gcode". The entries marked in orange may be adopted to the
valid settings for your printer and material.
For the most tested materials I got good results with K-values between 90
and 150, the delay for my printer is D100 for all material up to now, I
didn't put too much effort to optimize this value, it works.
Finally a warning for all tester: this algorithm is experimental and
up to now sensitive on buffer underrun. Printing the test structur from
external source like octoprint is running smoothly, structures with lot of
small segments like circles or other irregular shapes will easily
generate a buffer underrun since the transfer rate of the USB is still too
low. Therefore I'm always printing from SD-Card.
I faced some print stops when octoprint is running in parallel, which I have
to evaluate further. So my recommendation is to print with pressure advance
as stand alone printer without interrupting by USB requests yet. Support for
improvement is welcome every time.